Wednesday, 2 September 2015

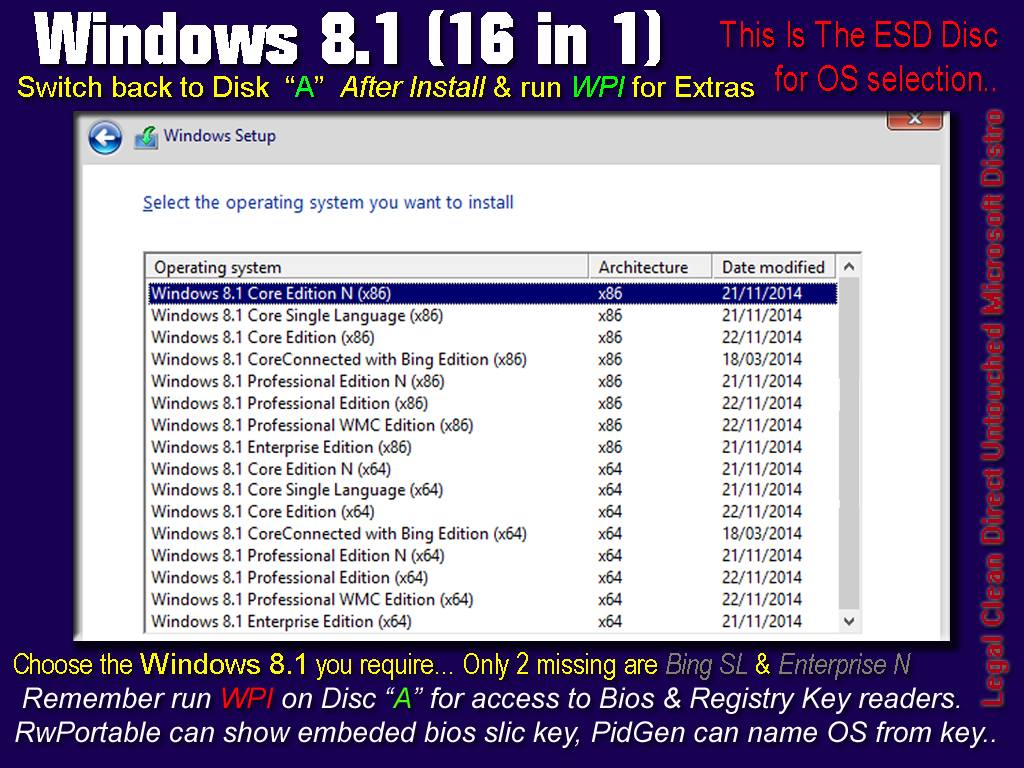
Choosing OR Automated Selection Finding the Right Windows 8.1

So you upgraded to 10 and wana downgrade to 8.1 or you just set up an 8.0 machine and your thinking theirs gotta be a faster way to get 8.0 right up to date with 8.1?

First remember Microsoft now allow users to download almost every Windows 8.1 (that's legal for the public) but clearly that's a lot of downloading just to find the right OS, you could use PIDGEN to determine your exact version of windows 8 or 8.1 (then use the windows 8.1 media creation tool to download an 8.1  (your 8.0 key will work with the 8.1 download) as long as you pick the right version,  IE,  Core, CoreN  (sadly you can't download the 8.1 with Bing  AKA CoreConnected  (unless you torrent a few ISO names)

How i built my 8.1 DVD and made Picking an OS  "Optional"
Ber in mind it is LEGAL to download windows 8.1, install it with NO serial number.. then go to Update and click Buy Product Key  (online) so it is worth having an 8.1 disk where you can PICK the version you want to install, and yet have a version that can Detect a Bios AND a Manually entered key..  heres how...

Download
Windows 8.1 CoreN  x86  and x64
Windows 8.1 Core Single Language  x86  and x64
Windows 8.1 Core  x86  and x64
(you only need them 3 legally speaking, don't download pro as it installs as Core and then wants Pro upgrade key.. so downloading pro will involve 2 keys and 2 activations, thats messy)
if you wish to download and add Enterprise, Enterprise N, CoreConnected and CoreConnected SL from a torrent  (then that's your choice)

So far (in the order of size & tidiest way to merge them) you have CoreN, CoreSL and Core

Number them like this

01 Windows 8.1 CoreN (x86)
02 Windows 8.1 Core Single Language (x86)
03 Windows 8.1 Core (x86)

make a COPY of CoreN and Name It

04 Windows 8.1 Professional N (x86)

 (open this copy in a WIM manager like Win ToolKit)

Click mount the image, once mounded, select  Upgrade Image (and select Professional)

Un mount saving changes... Do that for the 01, 02, 03 cores, and you'll have 3 pro's that install AS Pro!! (now giving you 6 versions rather than 3)

Now, make a Copy of Each Pro.. give them the name Professional WMC, mount each one and do the upgrade image to Professional WMC

Now (with them numbered and what not) and if you downloaded enterprise or what ever

Make a "copy" of CoreN x86  WIM file and call it install.wim

Then Microsoft Tool Kit, select Wim Manager and Import the x86 wims one by one in the order they should be from number (and save / rebuild WIM)

Then import the x64 wim files, when its finished select Rebuild
    and you will have them ALL within 1  install.wim
(optionally you can use   ESD2WIM-WIM2ESD-dism   to crush it into an ESD and save up to 1.2GB)
  SetUp from  ESD is only compatible with windows 8 or Higher...

Unlike windows 7, to be able to select a Windows 8.1 you actually need an ei.cfg file inside the disks Sources folder with the following information

[Channel]
Retail

[VL]
0

That forces the setup exe to list all the images inside the WIM or the ESD

If you don't have that  ei.cfg file in the sources folder then setup.exe WILL look at the motherboard for a Serial number in the Bios  (if it finds one it'll OK your key) and offer you an x86 or x64 for your serial. (thus guaranteeing your activation is easy and legal)

With the     EI.CFG    file in place
Remember the media creation tool downloads can take 8.0 or 8.1 keys so letting the setup exe and bios work with the WIM or ESD can find the exact version that was shipped with the system.

It Knows the Exact version of 8.1 your Product Key is designed for
It checks every WIM you imported into the one file against the SKU and product key
     then offers BOTH 86 and 64 for that specific OS...

OR you can have the EI.CFG    "INSIDE"   the sources folder and Choose an OS..
    (remember this is legal as they need a key and activation within 30 days)

Note that RWPortable WILL run in a PE setup environment, so if you stuck that in your rout, then before clicking Install you held Shift and pressed F10 to open a command prompt and typed   C: and hit enter (then typed RW and hit enter)  you could poke about the bios for the systems slick key (but that only gets you the key) Sadly the likes of PIDGEN wont run properly under PE environments.

BUT You could let setup.exe and your wicked ESD do the job for you by simply removing the CFG file to let setup find the motherboards product key.

For this i have created my own CMD file that is inside the root of my USB (the source i mainly restore 8.1 onto systems with)  sometimes i learn it was a windows 7 system, so the user is then forced with 2 legal choices.. put the right 7 bk in (get free upgrade to 10) or buy 8.1, a choice of which i can offer in hand with a Clean install of any legal os..

My CMD file looks On my USB for the ei.cfg,  If it finds it it warns me its in place and asks if i wish to remove it (and vice versa when its been removed)

Here it is running where i can choose an OS the user would later have to purchase

Detects the file and within windows you can see the file
It will then offer you these choices
After Deleting the file i get this screen
Now if offers the option to restore it and recheck for it
To begin with you need the  ei.cfg in your sources folder and a copy of it called ei.bak

then my script called   CheckKey.cmd   (placed in the root of your USB)

@echo off
TITLE    Windows 8.1 Version Select - Enable and Disable Script
color C
@echo off

:START
:Checking For The Product Key and Version Config File
IF NOT EXIST %CDROM%\sources\ei.cfg goto MENU2
IF EXIST %CDROM%\sources\ei.cfg goto MENU1

ECHO.
:MENU1
cls
color 47
ECHO.
ECHO.
ECHO  The Product key (ei.cfg) file has been detected in sources folder.
ECHO.
ECHO With the existance of EI.CFG, Setup.exe Can't check the Bios for Embeded KEYs
ECHO  EI.CFG also stops you Manually Entering your KEY Until After Setup
ECHO.
ECHO With that factor in mind (without ei.cfg) you Can let setup.exe
ECHO  A - Auto Detect Machines Bios SliC Key (Jumps to architecture choice)
ECHO  B - Allow You Manual Entry Of Product Key (Jumps to OS and architecture choice)
ECHO The product key, ESD and Setup auto defines which 8.1 is Valid for that key
ECHO.
ECHO   If Setup accepts the Product Key you will see both x86 and x64 for the
ECHO  8.1 Release the Product Key is valid for, be it Core, CoreSL, Pro, so on..
ECHO.
ECHO  This guarantees Genuine Activation on Windows 8.0 or 8.1 Hardware
ECHO  Setup.exe and the install.esd are both set to identify OEM and RETAIL keys.
ECHO.
pause
cls
ECHO.
ECHO.
ECHO  Do you wish to remove the EI.CFG file and have setup Auto Select an 8.1 by Key
ECHO   Or go with the Manual OS Selection for later Activation on your hardware?
ECHO.
ECHO       =======================================================
ECHO          PRESS Number then Hit Enter to select your option
ECHO       =======================================================
echo.
ECHO  1 - Remove EI.CFG and let setup attempt Key Identification (recomended)
ECHO  2 - Leave EI.CFG and Manually Select an OS (not legally recomended)
ECHO  3 - Re-Check for presence of EI.CFG
ECHO  4 - Exit and do nothing
ECHO.
SET /P M=Type 1, 2, 3 or 4 then press ENTER:
IF %M%==1 GOTO REMOVE
IF %M%==2 GOTO CLOSE
IF %M%==3 GOTO START
IF %M%==4 GOTO CLOSE

:MENU2
cls
color A0
ECHO.
ECHO.
ECHO.
ECHO  The Product key (ei.cfg) file has Not Been Detected in the sources folder...
ECHO.
ECHO   With the existance of EI.CFG Setup.exe does Not Check for a Product Key
ECHO    So you will be asked later for one (before you can activate)
ECHO.
ECHO.
ECHO   With that factor in mind, with ei.cfg present you can select any 8.1
ECHO  1 of 16 versions in x86 and x64, but be weary there are 3 versions of core
ECHO  Working out the exact OS SKU for your Product Key is easier without the EI.CFG
ECHO.
pause
cls
ECHO.
ECHO.
ECHO     Do you wish to restore the EI.CFG file and Manually Select an 8.1
ECHO   Or go with the Key Auto Selection for Genuin Activation on your hardware?
ECHO.
ECHO       =======================================================
ECHO          PRESS Number then Hit Enter to select your option
ECHO       =======================================================
echo.
ECHO  1 - Restore - EI.CFG file (not legally recomended)
ECHO  2 - Re-Check for presence of EI.CFG
ECHO  3 - Exit leaving Product Key check in place (recomended)
ECHO.
SET /P M=Type 1, 2, 3 then press ENTER:
IF %M%==1 GOTO RESTORE
IF %M%==2 GOTO START
IF %M%==3 GOTO CLOSE

:RESTORE
copy %CDROM%\sources\ei.bak %CDROM%\sources\ei.cfg
cls
goto START

:REMOVE
del %CDROM%\sources\ei.cfg
cls
goto START

:CLOSE
exit

Then on the SetUp screen , be it choose Language, Region or the Big INSTALL button
you just Hold  SHIFT.. press F10 and type that C:  and hit enter

I have  TYPED    C:     then hit enter
WHEN IT CHANGES TO   C:\    type   CheckKey  and hit enter


Its main downside is you MUST  change to the USB path to run it..  I did put it into the boot.wim, so you can just type checkkey at the X:\sources    and that worked, but clearly it fails to accomplish a valid  IF EXISTS or IF NOT,  i did try running it also with the option to SETPATH
but that broke all access to cmd DEL and other aspects.
tbh its to much of a headache tryna remember the simple bits (when ya doing everything else to)
so alas.. one will have to type  C:  and hit enter before typing  checkkey.. shucks  lol

Ps
you could have 2 or 3 back up Configs,  then have a menu that will offer to remove, or restore an OEM, RETAIL or VLK  ei.cfg  ;)

Just remember, Legally speaking just picking your OS and running an activator isn't legal... but just picking the OS you fancy from a menu (then you use the buy key option and activate legally is)

This concept of CheckKey gives a VALID reason to own an A.I.O disk for servicing multiple machines in the I.T environment.


Monday, 17 August 2015

How To Really Get The FULL DirectX Offline Package?

This has bugged people for years, getting that stupid web installer OR even getting the so called Complete REDIST..  but what if you made your own Redist version that covered just about everything... Including that random April 2006 file that seams to come down outa no where. yet clearly Requiring Internet Access at a later date?
Ok this is boring to do, yet super simple, so simple its crazy...
First you download ALL the "full" redist versions they have to offer

you will end up with a stack of files ""DATE them by name as you save them""

Hit this link and look at the file names (there are 2 pages of files)


files that have names that look like this!!!
(there are WAY more than i am showing here)
DirectX End-User Runtimes (April 2006) Full Download
DirectX End-User Runtimes (April 2007)
DirectX End-User Runtimes (August 2007)
DirectX End-User Runtimes (March 2008)
DirectX End-User Runtimes (November 2008)
DirectX End-User Runtimes (March 2009)
and so on....

Grab them all... that are spread across the 2 pages
just the redists with the MONTH and the YEAR in the link name


Make a folder called  DirectX, put the FIRST (earliest dated file in the folder)
right click on it and select Extract to Here (no extract option?, install WinRAR)

Extract each one Directly into the same folder in order of Oldest First
 your last Right file to right click should be at "least June or something 2015"

When asked to Overwrite files (say yes)  when your finished you should have a folder with a Few DLL files, the setup exe file AND a load of CAB files


REMEMBER EACH TIME YOU EXTRACT A FILE (DELETE OR MOVE THE FILE)
so you know that ones been added.. make sure you do them in order


The June 2015 setup exe works on XP, Windows Vista, Windows 7, 7(SP1) 8.0 8.1 and Windows 10

you now have a full DirectX 9 user package for off line installing  :D


I ended up with  162  files

1   EXE file

2   DLL files

159 CAB files


I also installed GTA Vice City and Operation Flashpoint
(Disabling the Install DirectX option on both)
just to test if that April 2006 cab wanted to download when i ran the "webinst" version of DX
and it never wanted the cab.. Full Pack Concept Complete!!

To install this silently?

setup.exe /silent

you could add it to  WPI using this command line

{START} "DirectXInstaller" /w /MIN "%wpipath%\Install\Runtime\DirectX\DXSETUP.exe" /silent

Note if you use  /S  it often either says setup complete (and you have to click ok)  or it shows you the license agreement and you have to tick it and hit next, so I advise the  /silent  switch.

also note the /Passive doesn't work, nor does the  /norestart
(but that doesn't matter as it doesn't reboot and silent makes it passive)

will also run fine from a setUpcomplete.cmd

%ROOT%\Path To Direct X\setup.exe /silent


The mini WEB Installer to update DX online is here

The DirectX 11.1 for x86 and x64 can be downloaded (as MSU files) here

ps
if your trying to make one for WIndows 98SE or Windows Milenium
I think you have to stop on this file  directx_aug2009_redist.exe  (as in that's the last you extract)
Otherwise a DXSETUP.exe and the two DLL files beyond august 2009  might face issues


Thursday, 13 August 2015

White Icon On Desktop of Windows 10 Wont Go Away Fix

After upgrading to windows 10 you may find a white icon on your desk top that wont go away, you delete it, refest the desktop and the icon comes back, and yet you cant get any information about the icon at all besides delete, copy and create short cut?

Chances are its an OLD icon for internet explorer (some people use a reg tweak or tweakUI or similar programme to place a real internet explorer launcher on the desktop)  If thats the case and you remember doing that, you can try using this regfile to remove the Icon

right click on desk top, select New Text paste this in, save as  fix.reg
(make sure its not    fix.reg.txt  (it has to be .reg)  right click select merge, right click on Desktop select refresh and the Horrid useless white icon will be gone...
MAKE SURE WORD WRAP IS OFF
(to do that click the word "format" in notepad and make sure wordwrap is not ticked)
Your FINAL reg file should contain  THREE lines  (not 4)


Windows Registry Editor Version 5.00

[-HKEY_CLASSES_ROOT\CLSID\{871C5380-42A0-1069-A2EA-08002B30301D}]

[-HKEY_CURRENT_USER\Software\Microsoft\Windows\CurrentVersion\Explorer\Desktop\NameSpace\{871C5380-42A0-1069-A2EA-08002B30301D}]


also what about that Language bar you used to be able to click, tick don't show and its gone?
to remove the Language selector out the system tray, right click on the task bar, select properties, then under Notification area click Customise.. and the Language selection Bar / button  is now called " Input Local " turn that off and language bar be gone


Is Windows 10 Really Seeding Updates On The Bandwidth of The End User & Informing Others You Miss Certain Security Fixes?

Is Windows 10 Really Seeding Updates On The Bandwidth of The End User AND!
 Informing Others You Miss Certain Security Fixes?


IS THIS FOR REAL???

IF and i stress  IF  (for the legal FKS at microsoft)  If this is what it simply says it is then I personally  see MASSIVE DANGERS IN THIS

A) Your seeding updates to total strangers, allowing strangers systems to Network with your machine

B) a 3rd party machine can essentially knock on your door and ask for an update?..

what if you don't have that update?
that means someone knows you don't have that update right?
ber in mind a vulnerability nicely worded as "elevate privileges"
(loosely translated means make a user account, demote you from an admin to a user, then control your system and do what they want with it)

This is like wtf.... AGAIN...  you may remember my disgust when i found windows would also share Error Reports with other users & other stuff with gawd knows what if you don't Untick a mountain of stuff when ya first install it.. but this...    god help people tethering or using a dongle with that switched on.. let alone the Enforced updates.. note that things Switched ON by default
no wonder windows 10 is free to upgrade to...

So how long till they start charging us for Updates?
while our old windows 7 or 8.1 was still entitled to FREE updates until how long?...

Not a wise move when iPhones and iPads wipe the floor with windows poor use of CPU's... more and more people are leaving pc's and laptops for phones..

i sit here shell shocked at this fkn manoeuvre....

Sunday, 9 August 2015

Windows Post-Install Wizard (WPI) Tips


Some use full commands and silent install switches for adding software and tweaks to WPI the Windows Post-Install Wizard

first DirectX.. grab your self the JUNE REDIST from microsoft
make a folder called DirectX put the exe in their and Right click on it and select "Extract To Here"
not got that extract option?  (install WinRAR its free for basic use)

once you have DirectX extracted to the folder (delete the exe you downloaded, but keep everything that came out of it)  then in WPI use the following command & path to run it

{START} "DirectXInstaller" /MIN /w "%wpipath%\Install\DirectX\DXSETUP.exe" /silent

Its important to remember there is a  "  after the .EXE, then a Space, then the switches
(want to make a complete DirectX Package with it all, read this)

What about adding WinRAR to WIP?
x86 (32bit)
{START} "WinRarx86Installer" /MIN /w "%wpipath%\Install\Software\x86\WinRAR_x86.exe" /s
x64 (64bit)
{START} "WinRarx64Installer" /MIN /w "%wpipath%\Install\Software\x64\WinRAR_x64.exe" /s

if you use the programs name with architecture including as its UNIQUE ID like WINRARX86 and WINRARX64  then you can add the X64 ID to the x86 Exclude box and vice versa (so only 1 can be chosen)

Microsoft Silverlight?  (the singular Q doesn't seam to make it silent any more unless you add /passive)

{START} "MSSLx86Installer" /MIN /w "%wpipath%\Install\Runtime\Silverlight_x86.exe /q /passive

{START} "MSSLx64Installer" /MIN /w "%wpipath%\Install\Runtime\Silverlight_x64.exe /q /passive

Microsoft Download Manager?

"%wpipath%\Install\Software\MS_DL_MAGR.msi" /passive

Hows about a Microsoft .NET exe?

{START} "MSdotNET" /MIN /w "%wpipath%\Install\Updates\NDP452-KB2901907-x86-x64-AllOS-ENU.exe" /passive /norestart

on the Dependency's you could use

getOSver()="Win7"

so it only shows up on windows 7 systems, or use like

getOSver()="Win7" || "Win8" || "Win8.1"

also note you can run a BAT  or a CMD file simply using

"%wpipath%\Install\Scripts\NameOfYouBATorCMD.bat"

You may also notice some things clash with others, bat and cmd files seam to hold other stuff back while they work, but launching EXE and MSI files can launch multiples at once, in turn (depending on software choices) you may get windows installer service is in use by another processes, or please wait for the other installer to complete.. solution?

well you could impose the WAIT command using  /w
usage wise an example would be...

{START} "MSdotNET" /w /MIN "%wpipath%\Install\Updates\NDP452-KB2901907-x86-x64-AllOS-ENU.exe" /passive /norestart

This shows what's installing on the WPI window
This makes it wait for the current thing running to finish
This runs it minimised to task bar

This would be handy to include with all exe and msi stuff you add, besides the fact you'll save windows installer getting confused, you'll also prevent any MSU files that patch .net failing while .net is actually still installing, but the /w is optional, as is the /MIN.

My little CMD file in action.. that installs the MSU files

the /w command in action making each install wait for the last to finish
Adobe Acrobat Silent Install Switch?

/sAll Run installer in silent mode.
/sPB Silent mode with minimum UI: show the progress bar only.
/rs Reboot Suppress. Setup.exe will not initiate reboot even if it is required.
/rps Reboot Prompt Suppress. If reboot is required, the system restarts without warning.

I would use something like
{START} "AdobeReader" /w /MIN "%wpipath%\Install\Readers\Acrobat.exe" /sAll /rs

something to remember is although seeing progress bars on software lets you know its running all ok, it slows things down (especially if windows is running on a temp native ms video driver)

WPI installing microsoft .net on Windows 7 SP1 followed by its required updates


note the main installer is x86 and x64 (so i added a single entry just for x86) i set up the updates after it (so one does the app & its x86 updates)  Then to save time (and the fact the updates don't do both)  I selected CLONE to make a copy  of the x86 and changed all the x86 references to x64.


NOTE:
when it comes to .NET updates, you could have ONE install listed under (both)
and have option to run ALL the actual updates (under it) BUT with a prefix to define Windows Architecture  before starting the update..

EXAMPLE
{86} {START} "DotNetX68Up1" /MIN /w "%wpipath%\install\7\Updates\x86\DotNET\NDP45-KB2972107-x86.exe" /passive /norestart

{64} {START} "DotNetX64Up1" /MIN /w "%wpipath%\install\7\Updates\x64\DotNET\NDP45-KB2972107-x64.exe" /passive /norestart

so it has the  {86}  or  the  {x64}  then  {START}  a space between  the   }  {
I also used the get os version to only make it show up on windows 7 (due to the EXE updates not really compatible with 8 or 8.1 as most there .net updates are MSU files)   I also set the "greyed out option" on the x86 to look for the bits64 thing  to set the greyed out on the x64 to the bits32.
This way when the WPI is run on an x64 installed OS it wont even have any visible x86 stuff  and when run on an x86 it won't show any x64 stuff.

 And to further avoid conflicts i also set the dependencies screen to block any x86 UNIQUE ID  if x64 is selected and vice versa under  EXCLUDES on the Dependencies screen.

Why wont reg files work?  its a problem with WPI.. knock off BOTH the  "  " symbols

EXAMPLE WORKING
{REGEDIT} %wpipath%\Install\Tweaks\filename.reg

EXAMPLE NOT WORKING
{REGEDIT} "%wpipath%\Install\Tweaks\filename.reg"

DON'T use the  "  and DON'T add any silent switches (and it'll just work silently)  ;)

Microsoft Office ?{START} "Office2007Install" /w "%wpipath%\Install\Office2007\setup.exe" /config config.xml

note that my config.xml has my serial number in and i removed the !! commented lines so it installs the components i want, but note ive left out the /MIN
(that's so it doesn't run minimised)  i did that for people who run this and use others keys on their systems (so they essentially need to interact, enter their name and their key for them to use it)  So that's not defaulted to  /MIN  (minimise) so you know when its ready to input details.

I guess if your sound drivers pre-loaded you could have it Chain a sound file Before the app link (like i did the .net updates having app and updates on one) what if you actually chain an audio file then the app   (a beep or what ever) so you know when a specific installer is open or pending..
i feel some voice overs coming on for sure LOL.

go on.. seeing as im on a roll.. how about VLC Media Player Silent Install ?
only issue with VLC is you have to set a Language switch (to which English is 1033)

{START} "VLCx86Installer" /MIN /w "%wpipath%\Install\7\Software\x86\VLC_x86.exe" /L=1033 /S

Also note that i use numbers in path for OS version simply because one day they may no longer support that OS with the Latest (this way you always maintain OS backward compatibility as your menu grows)

I also Re-Name them installers to more simple terms (you can get version number by right clicking, hit properties then the version tab)  renaming these installers to simple stuff like JaVa_x86.exe makes it easier to Update your Disc/USB by just getting the latest release and renaming that (rather than having to edit loads of the menu boxes) Though you should change the version details on the box that checks what ver is installed and the visual box offering the software to install, you can get that via the EXE's properties once installed via the ?.?.?.?  options.. The current VLC for example is 2.2.6.0  ;)

I must be possessed tonight...

MSE Microsoft Security Essentials silent install  (windows must already be activated)

{START} "MSE7x64Installer" /MIN /w "%wpipath%\Install\7\Software\x64\mseinstallx64.exe" /s /runwgacheck /o

you can Remove the  /o  and it'll check online for an update  OR you can leave the /o in place so the nets not required and then just Chain the update exe Under it like this..

{START} "MSE7x64Updater" /MIN /w "%wpipath%\Install\7\Software\x64\mpam-fe.exe"


odd shots of WPI's ive messed about with...
(and NO i wont provide these so don't ask for them)


I have more to add to this post with bits ive been working on, messing about seeing if its a viable platform for servicing my own systems.  At the moment ive been experimenting with software based interfaces for a mate (who owns this blog, that i sometimes write for...)

My own needs would be more suited to Plugns (audio mainly)  VST  (stand alone and installers)  so many installers, registry tweaks and so on (for varied software)  Id like to create an external drive where i can install the likes of "Native Instruments Knokat"  or  "Reason 5"  and have it copy over all the extra stuff for the specific app chosen  (i don't have big terrabytes of drive space on my main computer) So i often make a restore point, install something wildly drive hogging with all its extras and then restore back and install something else..  this menu makes system changes like that a breeze...

Universal Driver Disk Idea
what about a drivers section that shows Nothing (unless that driver is available?)
so you have 3 folders  AnyBIT (drivers working on x86 and x64) then you have an x64 folder and an x86 folder.. In them folders you have the Lan, Modem, Network and so on.. make one lot of folders (then while empty copy them to the other 2 dir's

then place drivers in the folders and rename the exe files to   setup.exe

then in WPI (dependencies tab, bottom LEFT box) you would add the likes of
FileExists("%wpipath%\Install\Drivers\AnyBIT\Bluetooth\setup.exe")
FileExists("%wpipath%\Install\Drivers\AnyBIT\CaptureCard\setup.exe")
FileExists("%wpipath%\Install\Drivers\AnyBIT\Cardreader\setup.exe")
FileExists("%wpipath%\Install\Drivers\AnyBIT\Chipset\setup.exe")
FileExists("%wpipath%\Install\Drivers\AnyBIT\Dongle\setup.exe")
FileExists("%wpipath%\Install\Drivers\AnyBIT\Fax\setup.exe")
and so on for each one...  this way only available drivers would show up on the menu  ;)
(speedy way to make these is make one list for AnyBIT)
add them all to the list then in notepad hit edit, find and replace and replace
\AnyBIT\
with
\86\    and click replace all
(yes i have met people who have taken hours to edit a bat file and list like this LOL)

you can also throw the architecture command in line to avoid the wrong one being installed
{OS=Win8.1} {x64} {START} "PrinterDriver" /w "%wpipath%\Install\Drivers\x64\Printer\setup.exe"
that will make WPI skip it if its ticked on a 32bit running OS

feel free to leave your ideas and tweaks in the comments, they may help me and others get more out of this fantastic program.

Remember WPI uses the &&  ||  phrasing, so you can also define an OS and Architecture in the (bottom left) dependency box so that stuff wont even show up on systems you don't want it to

 this for example would stop it showing up an an x64 windows 8.1 and hide it from every other version of windows its run on
 getOSver()=="Win8.1" && getBits()==32

if you wanted it to run on both, you could simply just state  getOSver()=="Win8.1"
or be cocky and state
getOSver()=="Win8.1" && getBits()==32 || getBits()==64
so its using the AND and the OR statement

If we wanted to Detect something to see if its already installed (so we don't re-install it)
we could use the Dependencies box on the bottom right, so if it detects the file presence AND its actual installed version number, it'll grey out the option to install it.  Using the OR expression you can check both locations (regardless of if its installed in program files.. or program files (x86) by checking Both Paths with the ||   OR in between

getFileVersion("%PROGRAMFILES%\Malwarebytes Anti-Malware\mbam.exe")>="2.3.55.0" || getFileVersion("%ProgramFiles(x86)%\Malwarebytes Anti-Malware\mbam.exe")>="2.3.55.0"

if its Not installed (OR you have a Newer Version already)  it'll grey out the option to install the 2.3.55.0 you added to your install dir in wpi

It opens up some fantastic ideas if you wanted to make a servicing disk, ber in mind windows 7 for example (be it 7 or 7 SP1) is just  winver 7, so if you put the disk in a none sp1 machine stuff would show up you'd not want available until SP1 was installed...

So you could check for windows 7 && the service pack 1, or you could check for windows 7 so if you wanted to offer the ability to Install SP1, the left box would be

getOSver()=="Win7" && getBits()==32 && getSPver()==0
or
getBits()==64 && getOSver()=="Win7" && getSPver()==1
the order often has random effects, try your design in different environments

Example on Windows 10 work in progress from an 8.1 template
Example on Windows 8.1